


"CollageIt is a very nice and useful photo collage utility."
- Soft32
" It's a great photo collage software! A very, very fast and simple photo editor."
- Benjamin Glettenberg
When you are make collage using CollageIt, the photos should be added to the Photo List in the first step. Once you have added your photos and generated the photo collage, you can change some basic layout settings.
You can change the layout using the Random Layout button directly. In another way, CollageIt offers plenty of parameters to generate the new collage layout, make settings with the various sliders and click Random Layout to generate different collage layout and get most stunning collage you ever created.
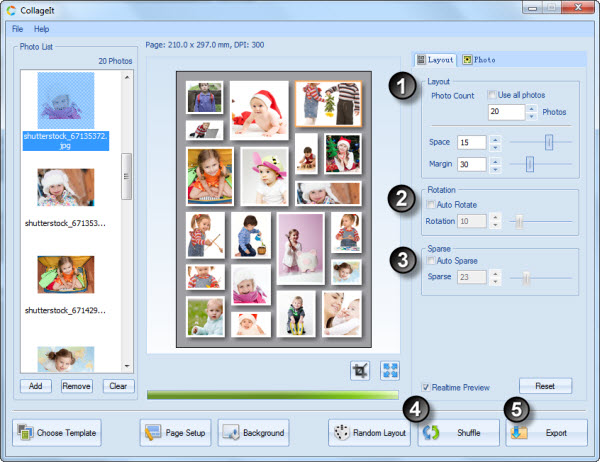
In the Layout tab, go to Photo Count tab, you can check “Use all photos” box to display all the photos you have added in the Photo List, and each photo will be displayed in the collage only once. In another way, inputting the numbers of photos in the edit box is available to set the photo count.
The Space option helps you increase or decrease the space between the images, just input the numbers in the box or dragging the slider next to it.
The Margin option helps you to adjust the page margin of the collage, input the numbers in the box or dragging the slider next to it.
In the Rotation tab, check Auto Rotate box to set the photos to auto rotate.
The Rotation option allows you to manually set the photo rotation, just input the numbers in the blank area or drag the slider next to it, the high rotate values you set, the more intense rotating photos you will get.
In the Sparse tab, check Auto Sparse box to set the photos to auto rotate.
The Sparse option allows you to manually set the collage sparse mode, just input the numbers in the blank area or drag the slider next to it, the high sparse values you set, the more intense sparse collage you’ll get.
You can click Random Layout button indefinitely to generate the random layout of the collage according to the parameters you have set. In addition, you can shuffle photos on the layout using the Shuffle button to get the best results.
When you’re happy with your collage, click Export button to save the custom photo collage as an image so that you can send it to your friends and families via email, hang it on the wall as a poster, upload it to your blog or the image hosting site.